AVATARMECHA

KeyBot Support

KeyBot Support Center

How to use KeyBot, the hardware macro keyboard that runs without a PC, and all its resources in one place.
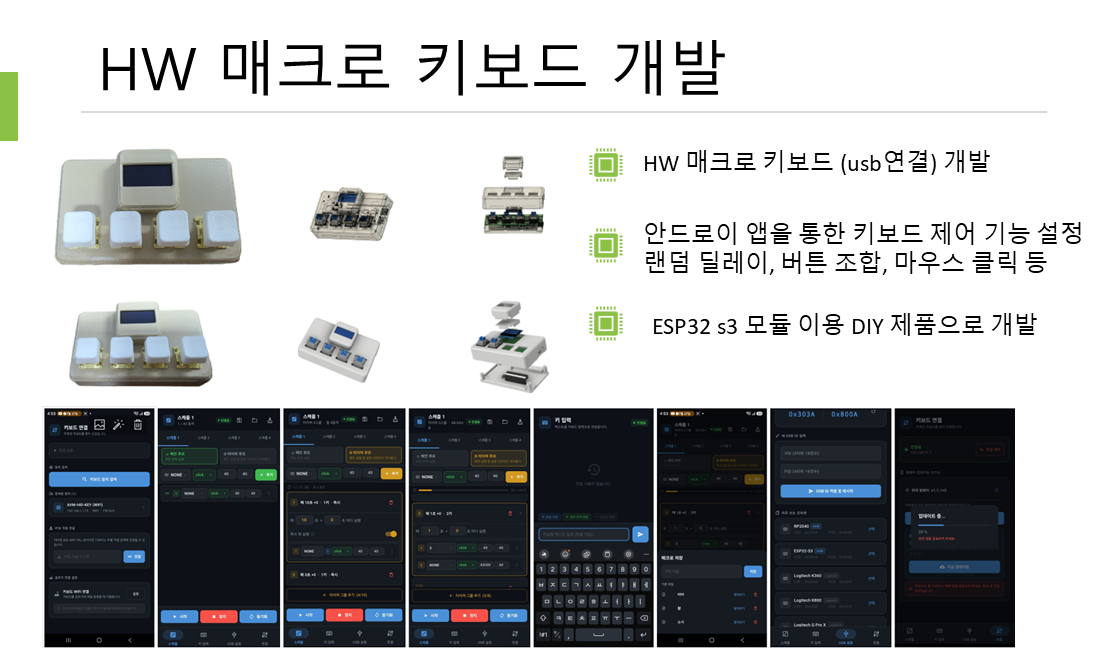
KeyBot device and app screens

Quick start

If this is your first time

Connect the device and run your first macro in three steps.

  1. 1

    Prepare Wi-Fi and power

    Connect your phone to the router's 2.4GHz Wi-Fi, then plug USB power into the device. The OLED shows the WIFI SETUP screen with an app-install QR code.

    See first-time setup →
  2. 2

    Set up Wi-Fi in the app

    Enter the password in the KeyBot app's Wi-Fi setup. The device connects and its IP address appears at the top of the OLED. Then scan for the device in the app and connect.

    See app connection →
  3. 3

    Edit a macro, then Start

    Edit the macro in the app or create it with Create with AI, then tap Start to send and run it in one step. Afterwards the physical buttons can run it too.

    See send & run →

FAQ

FAQ

Tap a question to open the answer. Each answer links to the manual for more detail. (For firmware v2.4.3 · app 2.5.1)

How do I connect to Wi-Fi the first time?
  1. First connect your phone to the 2.4GHz Wi-Fi of the router you want to use.
  2. Connect the device to USB power (a PC USB port or a USB charger). The boot screen appears on the OLED.
  3. If there are no stored Wi-Fi credentials, the OLED shows the WIFI SETUP screen with an app-install QR code, and the device waits for BLE setup from the app. (Scanning the QR code opens the KeyBot page on Google Play.)
  4. Open the Wi-Fi setup menu in the KeyBot app; the SSID your phone is connected to is filled in automatically. Enter the password and tap Connect. If the SSID is different, type it in.
  5. If an IP address (e.g. 192.168.1.50) appears at the top of the OLED, you are connected.
More on first-time setup →
I have several routers with the same name. Which one will it connect to?

With firmware v2.4.3 and app 2.5.1 you can choose which router to connect to, even when several routers share the same SSID and password.

  • If two or more are found, the app shows a “Several routers with the same name were found” dialog; tap the router you want. The list shows the end of the MAC address (compare it with the MAC on the router's label), the signal (dBm) and the channel.
  • If you tap “Automatic”, or make no choice for 90 seconds, the device connects to the router with the strongest signal.
  • The router you pick is stored on the device and used directly from the next boot. If it can't be seen, the device connects to the strongest router.

The dialog appears only when both app 2.5.1 and firmware v2.4.3 are installed. Mixing with older versions still works, but then the device connects to the strongest router without asking.

More on first-time setup →
Can it connect to 5GHz Wi-Fi?

KeyBot supports only 2.4GHz Wi-Fi. It cannot connect to a 5GHz-only router, so make sure the router's 2.4GHz band is turned on. If the connection fails, the device retries automatically up to 3 times.

More on first-time setup →
Do I need to set up Wi-Fi again after a power cycle?

No. Wi-Fi credentials are stored permanently inside the device, so it reconnects automatically after a power cycle and BLE setup is not needed again.

More on first-time setup →
How do I find and connect to the device in the app?

The app and the device must be on the same Wi-Fi network.

  • Tap “Scan for Device” on the app home screen to find devices on the network automatically, then pick KeyBot from the list.
  • Or type the IP address shown on the OLED into the app's settings.
  • Once connected, the app loads the schedules stored on the device and shows “Connected” at the top. If you close and reopen the app, it tries to reconnect to the last IP.
  • If the device's IP changes after a router reboot, the app searches the same Wi-Fi again and reconnects automatically.
More on app connection →
I changed my router or my Wi-Fi password.
  1. Hold the Wi-Fi reset button on the side of the device for at least 3 seconds.
  2. When the OLED switches to the WIFI SETUP screen, the stored Wi-Fi info has been erased and the device is in BLE setup mode.
  3. Enter the new Wi-Fi info in the app the same way as the first-time setup.

Wi-Fi reset erases only the Wi-Fi info. Your macro and schedule data is kept.

More on Wi-Fi reset →
How do I make a step that holds a key down for a long time?

Use PRESS (hold down) and RELEASE as a pair. Example: PRESS(A) → DELAY(500ms) → RELEASE(A).

  • RELEASE lifts only the selected key; leave the key empty to release every held key.
  • A key held with PRESS stays down while other CLICK/MOD steps run, and Main and the timer groups share the same held-key state. (Example: hold an arrow key with PRESS in Main while a timer group CLICKs a skill key.)
  • Holding up to 5 keys at once is recommended; always pair each PRESS with a RELEASE. Stop releases everything.

Supported on firmware v2.3.0 or later.

More on macro editing →
How do I type key combinations such as Ctrl+C?

Use the MOD action. It sends up to 6 keys at the same time, so it works for combinations such as Ctrl+C or Shift+Alt+Tab.

More on macro editing →
How do I send mouse clicks or the wheel?

Choose MOUSE as the action, then pick left-click, right-click, wheel up or wheel down in the left cell. A mouse-action picker opens instead of the key picker.

More on macro editing →
What are the action types, and how do I set the delay?
  • DELAY: wait only / CLICK: press then release / PRESS: hold down / RELEASE: release key / MOD: up to 6 keys at once / MOUSE: mouse input
  • Delay (ms) is the wait until the next step (not how long the key is held). The minimum is 20ms, and 40ms for DELAY steps.
  • CLICK, MOD and mouse clicks hold the key for 60–110ms (re-rolled for each click), so if the delay is shorter, the next step starts as soon as the click ends. To hold for an exact time, use PRESS → DELAY → RELEASE. (Firmware v2.4.0 or later)
  • Random (+r) is a random range added to the delay. 0 means a fixed delay.
  • Reorder steps with the drag handle (≡) in the list.
More on macro editing →
Is there a limit to the number of steps I can store?
  • Main: up to 256 steps per schedule
  • Timer groups: up to 10 per schedule, up to 64 steps per group
  • Up to 4 independent schedules are stored, and all settings are restored automatically after a reboot.
See specifications →
Can I create a macro with AI?

Yes. Describe what you want in plain language to an AI chatbot such as ChatGPT, Claude or Gemini, and it produces a macro the KeyBot app can read.

  1. On the macro screen, open “Create with AI”, tap “Copy guide” and paste it into a new chat with the AI chatbot.
  2. When the AI asks, describe the action. For games, also tell it the recovery delay after each skill.
  3. Copy the AI's answer (JSON), then tap “Paste” → “Check” in the app.
  4. Choose the schedule (1–4) and a save name, tap “Apply & Save”, review the result and send it to the device with “Start”.

If the check reports an error, paste “Copy fix request for the AI” to the AI and you will get a corrected JSON.

More on creating macros with AI →
Can I save a macro and use it in another schedule?

On the macro screen, tap “Save” to store it in the app under a name (any language works), and “Load” to bring it into another schedule. Only the Main and Timer contents of the one selected schedule are saved or replaced; other schedules are untouched.

Loading and AI apply only change what is in the app. To put it on the device, send it with “Start”.

More on saving & loading →
How do the 6 run modes differ?
  • MAIN x1 (main once): runs the main sequence once, then stops
  • MAIN (main repeat): repeats the main sequence forever (no timer)
  • FULL (main + timer repeat): timer groups fire periodically while the main sequence repeats
  • TMR x1 (timers once): runs each timer group once with no main sequence, then stops
  • TIMER (timers repeat): repeats only the timer groups forever
  • FULL x1 (main + timers once): runs the main sequence and each timer group once, then stops

The selected mode is stored on the device, so the physical buttons run it the same way even after a reboot. FULL x1 is well suited for performing a login action once and then sending only periodic keep-alive input.

More on schedule run modes →
I started a timer mode but it stops right away.

Timer-related modes (FULL, TMR x1, TIMER, FULL x1) need at least one timer group. With no group, the schedule stops immediately. Create one with “Add Timer Group” on the Timer loop tab.

More on timer groups →
What do a timer group's interval, random and fire-immediately settings mean?
  • Interval (sec): how often the group fires. 120 means every 120 seconds, and 0 starts it immediately.
  • Random (+sec): a random range added to the interval. +25 fires randomly between 120 and 145 seconds.
  • Fire immediately: if on, the first firing happens at start; if off, it waits one full interval first.
  • Groups run at the same time with different intervals. Example: Group A (120s ±25), B (60s ±10), C (300s ±0).
More on timer groups →
What is timer group priority?

Each group can be set to Normal / High / Very High / Top (default: Normal). While a higher-priority group is running, lower-priority sequences (Main is always “Normal”) wait from their next step until that group finishes, then continue. Groups with the same priority run mixed together.

If a group's run time exceeds its interval, Main can barely progress, so be careful. Supported on firmware v2.4.0 or later.

More on timer groups →
How do I send an edited macro to the device and run it?
  1. Tap “Start” at the bottom to open the start-options popup.
  2. Choose the target (Main only / Timer only / Main + Timer) and the behavior (once / repeat); the combination selects one of the 6 run modes automatically.
  3. Tap “Start” in the popup. The app sends your current edits to the device and starts the schedule. The selected mode is stored on the device.

To stop, tap “Stop” at the bottom. Every running schedule stops immediately.

More on send & run →
Can I run it with just the buttons, without a PC or the app?

Yes. Once you have set the mode through the app (send and run), you can run it from the buttons on USB power alone, with no Wi-Fi connection. The device's 4 buttons correspond to Schedules 1–4.

  • Press a button once to start that schedule in its saved mode.
  • Press the same button again while it runs to stop (toggle).
  • Press a different button to stop the current schedule and start the new one.
More on the physical buttons →
Nothing happens when I press a button.

A button with no mode set does nothing, to prevent accidental activation. Send and run that schedule once from the app to store its mode, then press the button again. Pressing buttons rapidly can also make some presses be ignored, so press slowly.

More on the physical buttons →
A key stays pressed.

A press (hold) was stopped before its matching release ran. Tap “Stop” in the app and every key is released. In your macros, give every PRESS a matching RELEASE.

More on troubleshooting →
The device keeps restarting when Wi-Fi turns on.

Current draw jumps when Wi-Fi starts. Weak USB ports, hubs or long cables can cause restarts or boot errors. Use a PC motherboard USB port or a 5V 2A adapter with a short data cable.

More on troubleshooting →
What do the OLED screens mean?
  • Top left: Wi-Fi IP address / top right: USB connection status and Wi-Fi signal strength
  • Schedule boxes 1–4: the running schedule is highlighted with a white box.
  • Bottom text: shows the current schedule number and mode, such as “S1 RUN: FULL”.
  • WIFI SETUP: waiting for Wi-Fi setup (app-install QR shown); Wi-Fi info must be sent from the app over BLE.
  • OTA UPDATE: a firmware update is in progress; keep power connected until it finishes.
More on the OLED screen →
The app and the device show different contents. How do I match them?

Tap “Sync” at the bottom of the app and choose “Current schedule only” or “All schedules” to load what is stored on the device into the app. A full sync runs automatically whenever the app connects, so use manual sync when you changed something directly on the device.

More on sync →
How do I update the firmware?

Update from the app while the device is connected to Wi-Fi.

  1. On the app's Settings → Firmware Update tab, check the current device version and the latest version.
  2. Tap “Update”. The device downloads the firmware by itself and shows progress on the OLED.
  3. When it finishes, the device reboots automatically and runs the new firmware.

Never power off the device during the update. Keep power connected while the OLED shows “keep power on”. If an update fails, the previous firmware is restored automatically.

More on firmware updates →
Why and how do I change the USB VID/PID?

When certain games or software only allow specific keyboards, you can change the device so the PC recognizes it as that keyboard. In the app, go to Settings → USB ID, choose a preset or enter values manually, and tap “Apply”.

The defaults are VID 0x303A and PID 0x800B. The device reboots automatically after the change, and the PC may remove the old driver and recognize it as a new device.

More on changing the USB ID →
Which PCs and smartphones can I use it with?

The PC recognizes it as a composite USB keyboard + mouse (HID), so it works right away on Windows, Mac and Linux without a driver. The KeyBot setup app is available for Android.

See the overview →
Which languages does the app support?

The app supports 10 languages — Korean, English, Japanese, Traditional Chinese, German, French, Spanish, Indonesian, Thai and Vietnamese — and follows the language of your phone. Unsupported languages are shown in English.

See specifications →
What are the main specifications?
  • USB: HID composite keyboard + mouse, no driver required, USB 2.0
  • Wireless: Wi-Fi 802.11 b/g/n 2.4GHz, BLE 5.0 (for Wi-Fi setup)
  • Display: 0.96" OLED (SSD1306), 128×64
  • Buttons: 4 schedule buttons, 1 Wi-Fi reset button
  • Schedules: 4 independent schedules, 6 run modes
  • Storage: settings and key sequences stored permanently, OTA update supported (automatic recovery on failure)
  • Versions: firmware v2.4.3 · Android app 2.5.1
See all specifications →

Resources

Resources

Get the manuals, videos and the app in one place.

Quick manual

A one-page summary of the product overview and key specifications.

Full manual

Step-by-step guidance from first-time setup to AI macros, advanced timer settings and troubleshooting.

Assembly video

Watch how KeyBot is assembled.

Intro video

A video explaining how the KeyBot macro keyboard works. (YouTube)

KeyBot app Google Play QR code

KeyBot Android app

Scan the QR code, or use the button below to download from Google Play.

Buy KeyBot

KeyBot is available on the Naver SmartStore.

Still need help?

Send us the problem you ran into or a purchase inquiry. Our team will check and get back to you.

Send an inquiry